--->diese Seite gibt es auch auf
Deutsch.
Repairing CDROM drives
One of the most common causes for broken CDROM drives are dust and defective mechanical parts. These can be fixed rather easily, without needing special knowledge. These problems are:
- dusty focus lenses
- grease blocking the mechanic
- broken drive belts
However, repairing or replacing defective electronical parts is usually rather time-consuming and replacement parts are pretty expensive. In this case buying a new drive would be the better solution.
Step 1: Opening the drive
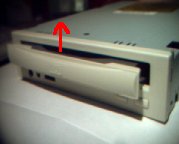
Most CDROM drives use a drawer for loading the media. These cover a part of the drive´s front as well. If the drive has a drawer, the first step is to remove the front plate of the drawer by pushing it upwards while the drawer is open. Pulling it a bit outwards in the middle helps in doing this. You can do this while the drive is still mounted within the computer.
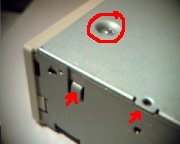
Now open the case. In order to do this, several screws (marked by the red circle) have to be removed and/or the case has to be straddled a bit (if the case is clipsed together, marked by red arrows). Often, the upper shell has to be lifted or pulled backwards before it can be removed from the front plate.
Attention: On some drives, the shell is on the underside and the mechanical parts are fixed on the upper part of the case!
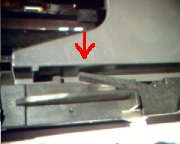
Especially the drive mechanic uses a lot of clipsed compounds. Open those by pulling them in the directions shown by the arrow using a screwdriver during their removal.
Step 2: Removing cables
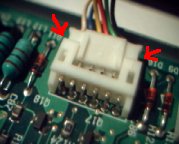
Simple jacks can be pulled off without needing further action. If it is stuck, lift the plastic material using a small screw driver at the marked positions.
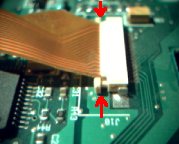
A bit more care is needed in combination with foil connectors since these are more damageable. These are usually mounted like this: There are small hooks at the marked positions which can be used to pull a plastic bridge forward. After doing this, the cable is already dismounted. During reassembly the cabel is moved into the connector, kept there by still pressing it a bit and moving the plastic bridge back to its old position simultaneously.
Step 3: Fixing problems
Problem 1: broken drive belts
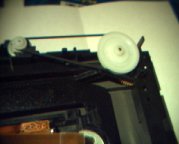
This problem is easy to find and is likely to appear in older drivers. Belts are either used for spinning the CD or for moving the drawer.
Broken belts can be repaired using superglue if they are not oily. Take care that the same edges are glued together at both sides in order to get an untwisted belt. Or buy a new belt. These are available as replacement parts for cassette drives (e.g. Conrad Nr. 349097).
A less common problem are oily belts. Clean them using washingup liquid. The belt wheels can be cleaned using dry tissue. Solvents are not recommended because these can damage the material.
Problem 2: Dusty focus lense
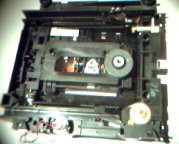
The picture shows the pickup, the most important part of the drive. It consists of a soft bedded slide with the laser, the fixed lense system and the versatile focus lense mounted on it. By the way, there is nothing to adjust here! The focus lense is positioned best automatically by a built-in feed-back loop (attention, the lense holder and the magnet coils are pretty filigree). Sometimes, there is a trimmer on the laser PCB which controls the laser power. Without proper meters and data sheets there is nothing which can be done with it. And if the laser wears off, it would not help for long. An increased laser power would just speed up the process.
But it can be useful to clean the lense (see circle in the next picture) from dust. Suitable tools are available in photo stores, compressed air works well, too. Special Cleaning CDs are usually less recommended, these do not clean the lense properly or can even damage the drive. During lens cleaning, the lense should be supported from the other side in order to prevent damage of the coil.
Newer drives have rather good dust protection, thus the dust problem usually appears only if the CDROM is changed very often or if the air is heavily polluted with smoke or dust.
Problem 3: sticky mechanics

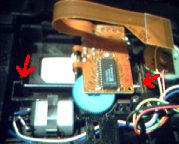
Another common problem are sticked mechanical parts. This can occur due to two reasons: The first is grease in combination with dust resulting in a sticky film fixing the slide or wheels. Removing the grease entirely on both slide rails and replacing it using silicone based lubricants (normal screw grease is too sticky, oil is too solvent) helps.
The second reason is aggregated grease at the end positions of the rails (this happened with both my Toshiba CDROM drives). If the end position consists of a plain surface which is oriented parallely to the slide end, a bit grease can be adhesive enough in order to stick the slide there. The problem can be solved by respreading the aggregated grease on the rail and cleaning the end. In order to prevent the problem from appearing again, use a cutter and slant the end in order to reduce the size of the contact area.
Tips
- Keep cool during the work and it is done in about an hour. If You don´t, well, imagine yourself...
- Arranging the parts according their position and assembly order helps speeding up the reassembly process. Otherwise, it might happen that You discover that an important part was forgotten during reassembly and you have to open the drive again.
- The drive behaviour allows isolating the problem. If possible, watch the drive behaviour of an open drive and the PC connected to it with and without a CD loaded. Check if the slide is moving to the right position, if the pickup is positioned and if the focus lense moves.
- Often, the CDROM drive itself is fine. Wrong BIOS settings, improperly plugged or broken cables, incorrect or uncommon jumper settings and broken drivers are more common than one might think first. Testing using an audio CD or using another computer can clarify this. Even experts often miss this!
Links